
Standard Ingest Procedure
Introduction
This document is for multi-service vendors performing work for FamilySearch. The Future Image Team in operations coordinates all ingests and project aspects, including providing access credentials and project setup.
The Standard Ingest Service ingests images and records into the FamilySearch Infinity System by uploading them with their associated metadata to a Transfer S3 Bucket managed by FamilySearch.
Access to the bucket is controlled by an AWS IAM Account with credentials provided by the Future Image Team. Each account restricts access to objects using a specific prefix, ensuring providers can only access their own files and information in the Transfer S3 Bucket.
Here’s how it works:
- Obtain your AWS bucket account name, login credentials, and project ID from the Future Image Team.
- Organize the files you want to ingest in a folder on your computer and create any new files you will need for the metadata.
- Upload your files to S3, making sure to follow the naming conventions.
- Use one of the FamilySearch status dashboards or the Status Service API to monitor your ingest. See the Monitoring Ingest Status section below for details.
Ingest files are organized by file and directory name. Follow the path and naming conventions below to ensure files are recognized and ingested properly.
- If you use a third party S3 access tool like Cloudberry to upload your files, you can stage the entire directory structure on your workstation before uploading them to S3.
- During the upload process, Cloudberry will name the uploaded files with key names, matching the full path name of the files on your workstation.
- If you write your own upload process, your system can rename the file names according to the naming conventions during the upload process.
Directory layout requirements for the S3 bucket
Base Subdirectory
Images and metadata files are uploaded by Groups (sometimes called Folders). Object naming, including paths and file names, is critical. The following pattern creates the base subdirectory for all image, record, and metadata files uploaded for a specific group. Image and record files are stored in an "artifacts" subdirectory within the base directory.
The base subdirectory is composed of the following components:
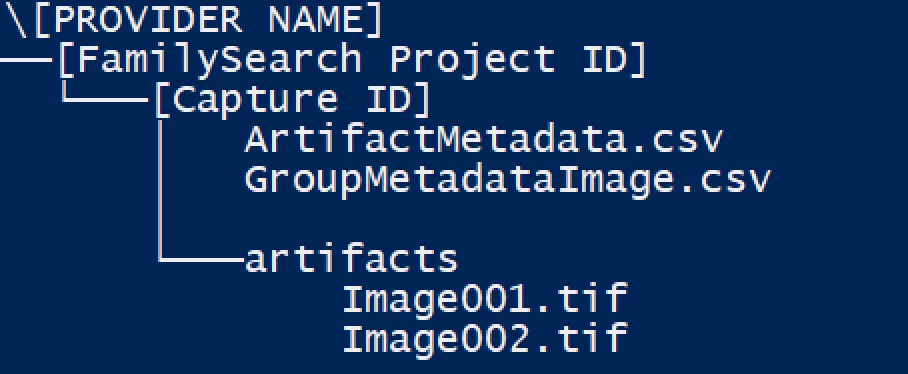
/[Provider Name]/[FamilySearch project id]/[Capture Id]/
- Provider Name: The root directory for all uploads for a specific provider. This name is also your IAM account name, and must be set up by the Future Image Team before uploading begins.
- FamilySearch project ID: The FamilySearch project ID defined for this project.
- Capture Id: A globally unique Capture ID created by the provider for this specific group of images.
Metadata can be provided in one of two formats: METS or CSV. The metadata files in the base directory will differ based on the format chosen.
CSV formatted metadata files
When using CSV format for metadata, you need to provide two different metadata files. One file contains the group metadata and the other contains the artifact metadata. There are two possible types of Group Metadata files depending on the type of artifacts being ingested, and one type of Artifact Metadata file.
- GroupMetadataImage.csv: Used to specify group metadata for image ingests
- GroupMetadataRecord.csv: Used to specify group metadata for record ingests
- ArtifactMetadata.csv: Used to specify artifact data for either image or record ingests
Example image file names and location in S3:
- /[Provider Name]/[FamilySearch project id]/[Capture group id]/GroupMetadataImage.csv
- /[Provider Name]/[FamilySearch project id]/[Capture group id]/ArtifactMetadata.csv
Note: CSV files must use a comma as the field separator. When a field value contains a comma or quote ("), the entire field must be enclosed in quotes, and any quotes must be "escaped" by using an extra quote ("").
For example, if you want to include this string:
Fred "Bud" Jones, Jr.
In the CSV file it would appear as:
"Fred ""Bud"" Jones, Jr."
Details of the CSV metadata files are included below.
Image and Record files
Image and record files are written to an "artifacts" subdirectory located in the group base subdirectory as follows:
/[Provider Name]/[FamilySearch project id]/[Capture group id]/artifacts/
Example image file names and location in S3:
- /[Provider Name]/[FamilySearch project id]/[Capture group id]/artifacts/Image001.tiff
- /[Provider Name]/[FamilySearch project id]/[Capture group id]/artifacts/Image002.tiff
The directory layout should look like the following image:
Group CSV metadata file specifications
The CSV file must have a header to indicate column order and contents. The header must use the exact names from the table below. Optional fields can be left blank, and columns for optional fields can be omitted from the file.
GroupMetadataImage.csv
| Field / Header Title | Sample | Description | Requirements | Required | METS Key |
|---|---|---|---|---|---|
Rework | TRUE | Indicates that this is rework of previously submitted material. | TRUE or FALSE | Yes | COM_REWORK |
Title | Michigan Births 1850-1875 | The title of the book/folder (GRMS listing title if no title is available) | Yes | MODS_TITLE | |
Place | Wayne, Michigan, United States | The location(s) of the events recorded on the image (or other artifact). Multiple values allowed separated by bar | Yes | MODS_PLACE_TERM | |
Start Date | 1850 | The start date of the events on the image (or other artifact) | Yes | MODS_CREATED_START_DATE | |
End Date | 1875 | The end date of the events on the image (or other artifact) | Yes | MODS_CREATED_END_DATE | |
Record Type | Birth certificate | The record type(s) of the image (or other artifact). Multiple values allowed separated by bar. Can be an official record type string, or the concept ID, which is preferred. | Yes | COM_RECORD_TYPE | |
Language | English | The language(s) used on the image (or other artifact). Multiple values allowed separated by bar | Yes | MODS_LANGUAGE_TERM | |
Record Custodian | Michigan State Archive | The organization/entity that has custody of the physical artifact | Yes | METS_HDR_AGENT_CUSTODIAN | |
Archival Reference Number | 45-3453-345 | The ID used by record custodian (required if there is an ID available – needed for delivery) | Yes | ||
Capture ID | 999-999-99999 | The ID used by the capturing organization (used for rework). | The Capture ID must be unique for each group ingested for a provider. | Yes | COM_GROUP_CAPTURE_ID |
Total Artifacts | 1078 | The number of images (or other artifacts) in the group | Integer number | Yes | COM_TOTAL_ARTIFACTS |
Capture Operator Name | SmithJane | Username of vendor associated with the Project ID | Must be a valid FamilySearch Username | Yes | COM_OPERATOR_NAME |
Capture Operator ID | cis.user.MMM9-TGFQ | CIS ID associated with the Username that is assigned to the Project ID (this should match the username provided in the Operator Name field) | Must be a valid FamilySearch account ID (CIS ID) or be left blank. Max Length: 18 Characters (CIS ID on backend) | Yes | COM_OPERATOR_NUMBER |
Volume | 3 | The identifier for a volume of a series of books/folders all under the same title (optional) | No | ||
Capture Date | 2019-02-13 | The date this group was captured (optional) | No | MODS_CAPTURED_DATE | |
Digitizing Entity | FamilySearch | The name of the entity that did the digital creation/capture of the group of artifacts (optional) | No | METS_HDR_AGENT_CREATOR | |
Artifact Type | NBX | The type of artifacts in this group. | Match values in ArtifactMetadata.csv "Artifact Type" field. | No |
Currently only one group per metadata file is supported. As a result, the group metadata file only contains two rows: a header row and one data row.
Ensure that the CSV file is UTF-8 comma delimited. Field values that contain a comma must have the entire value surrounded by double quotes. If you review your CSV file in Notepad or TextEdit, you should see something similar to this image:

Artifact CSV Metadata File Specifications
The CSV file must have a header to indicate column order and contents. The header must use the exact names from the table below. Columns for optional fields can be omitted from the file.
Please Note: The order of the entries in this file will be maintained when the images are published, Ensure each row appears in the order you want it to display (e.g., book covers, title page, page 1, page 2).
ArtifactMetadata.csv (one row for each artifact)
| Field / Header Title | Sample | Description | Requirements | Required | METS Key |
|---|---|---|---|---|---|
| Filename | Image0004.jpg | The filename for the artifact. Note: the extension must match the actual image file type. | Yes | mets:FLocat-href | |
| File Size | 3765432 | Size of the artifact file in bytes | Integer number | Yes | mets:file-SIZE |
| Artifact Type | Image | The type of artifact (Image, Audio, Text, ...) (optional - default to image) | Yes | mets:file-MIMETYPE | |
| Capture ID | 5b17447b-e972-403c-987f-ee4346784839 | The ID used by the capturing organization (used for rework). | Each artifact included in the csv file must have its own unique Capture ID | Yes | fscommon:artifactCaptureId |
| Hash Algorithm | MD5 | The hash algorithm used for computing the checksum. | Yes | mix:messageDigestAlgorithm | |
| Hash | d4f7beaa9828bb62b58f9497dc3778cc | The actual hash value | Must be a valid MD5 hash for the file | Yes | mets:file-CHECKSUM, mix:messageDigest |
| Image Width | 5192 | The width of the image in pixels | Integer number | No | mix:imageWidth |
| Image Height | 2834 | The height of the image in pixels | Integer number | No | mix:imageHeight |
We recommend checking your MD5 hash on 1 or 2 images. You can compare your hash with this free online MD5 hash generator: https://emn178.github.io/online-tools/md5_checksum.html (Note: we aren't sponsored or affiliated with this website).
Image Requirements
TIFF Images
TIFF images must be 1-channel 8-bit greyscale images, or 3-channel 24-bit color or greyscale images.
Record CSV Metadata File Specifications
The CSV file must have a header indicating column order and contents using the exact names from the table below.
GroupMetadataRecord.csv
| Field | Sample | Description | METS Key |
|---|---|---|---|
| Template | UUID | The ID of the template being used for records ingest (records) | fscommon:template |
| Flat File Flavor | Ancestry | The identifier of the template mapping standard (records) | fscommon:flavor |
| Data Format | flat-file | The type of record being ingested, i.e. flat-file, gedcom, or gedcomx | fscommon:dataFormat |
| Rework | TRUE | Indicates that this is rework of previously submitted material | COM_REWORK |
Currently only one group per file is supported, so the group metadata file contains only two rows: a header row and a data row.
Uploading objects
Login credentials limit access to a root directory (S3 prefix) in the S3 Transfer Bucket. Bucket Name, Account Name, Access Key, and Secret Key will be provided by the Future Image Team. For security reasons, the Access Key and Secret Key will be changed periodically.
FamilySearch has separate S3 buckets for Development, Test, and Production environments. All three bucket names will be provided to you, and access to all three is allowed with your account. The Development and Test environments may be used for testing; however, any tests must be coordinated with the Future Image Team to ensure a project is set up to receive your ingest. If a receiving project is not set up in advance, the ingest will fail.
The group metadata file (GroupMetadataImage.csv or GroupMetadataRecord.csv) serves as the completion trigger and should be the last file uploaded for a specific group.
Multiple options are available for uploading the objects into S3 from your computer. For example:
- A third party application such as Cloudberry can be used.
- Amazon provides an SDK with API's that allow you to write files to S3
- Standard HTML POST calls can be made to upload files.
Cloudberry
Cloudberry provides a client application for MS Windows that enables easy file uploads to an S3 bucket for copying files from your computer to the FamilySearch S3 Transfer Bucket. It offers both free and paid versions with different upload capabilities:
- The free version uploads one image at a time.
- The paid version utilizes multiple threads and simultaneous uploads of multiple files.
Depending on your internet speed, this difference can significantly impact upload time for large numbers of files.
To get started with Cloudberry:
- Download and install the application on your computer.
- Register your Amazon S3 account within the Cloudberry application using the account information provided by the Future Image Team:
- Open Cloudberry and navigate to "File > Amazon S3."
- Enter the Access Key and Secret Key provided, and click "Test Connection" to verify, then OK to save.
Once you have added the Amazon S3 account, you can select it from the "Source" dropdown shown on the right half of the screen.
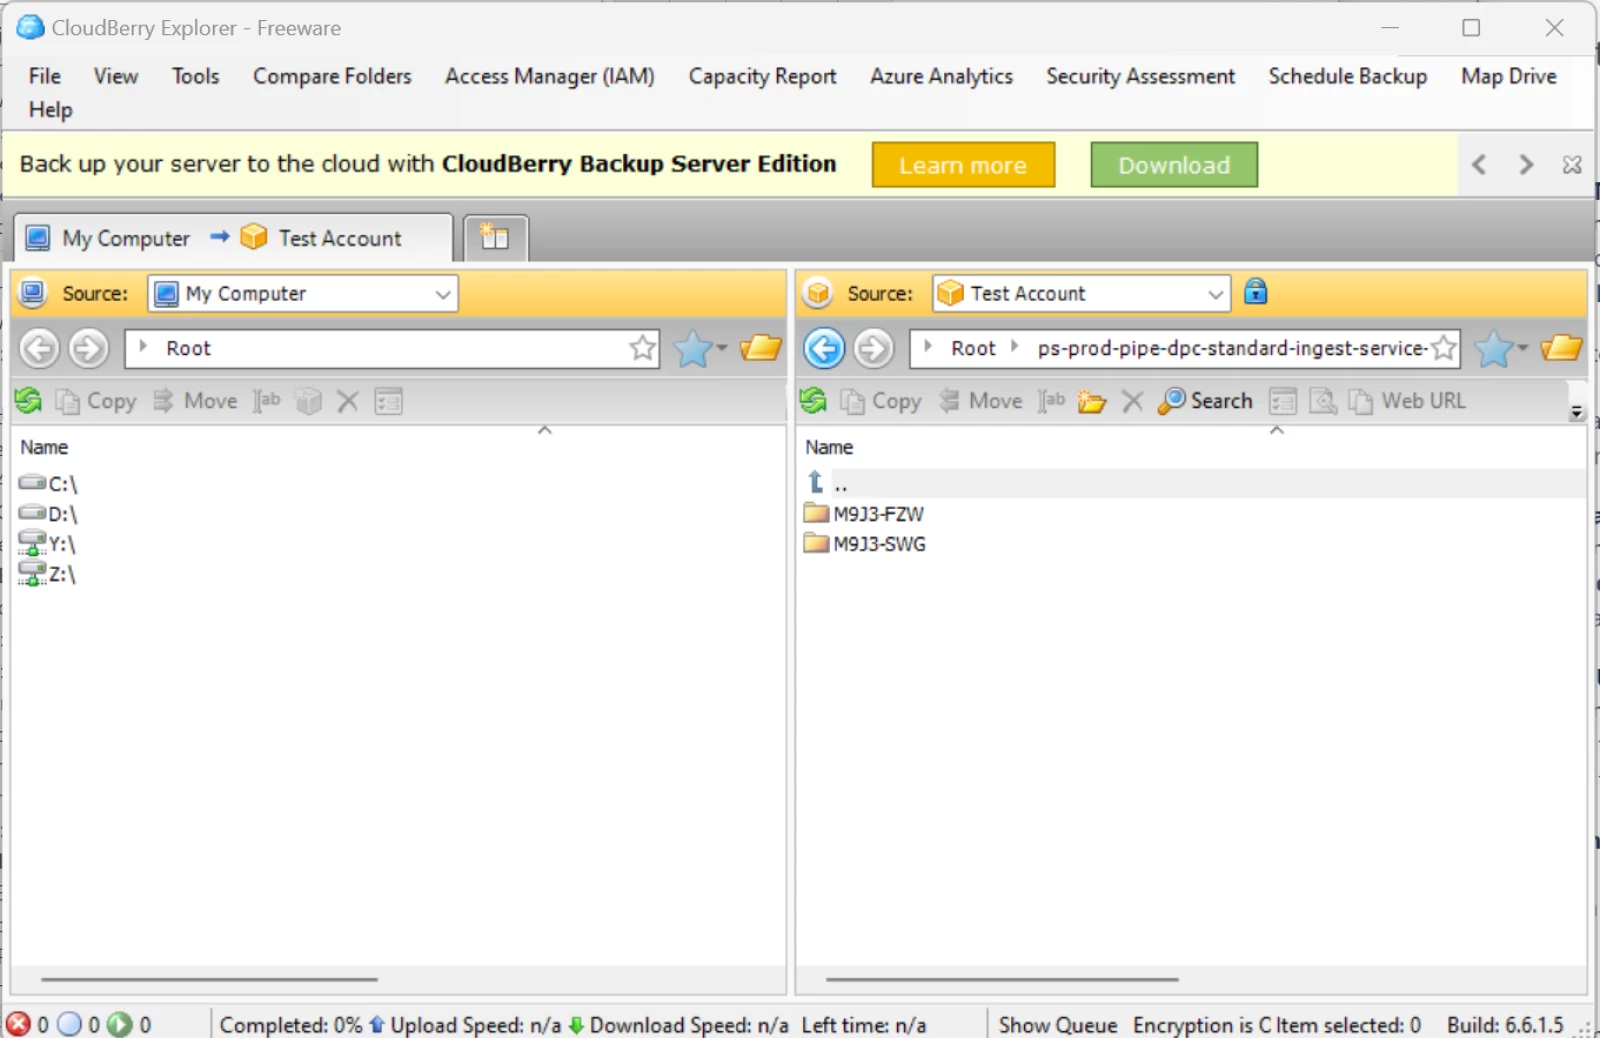
Next, enter the S3 bucket name and account name in the folder field just below the Source dropdown:
- Use the same naming format as you would for a folder: bucketName/accountName. The Future Image Team will provide you with this information.
After completing these steps, you'll see the contents of the root S3 directory for your account on the right side of the screen. Note that because you entered your account name as part of the folder string, the initial page will display files and directories in your bucket/accountName/ directory.
Due to account restrictions, you won't be able to view anything higher than this directory. When following this procedure with Cloudberry or a similar tool, you don't need to add your accountName to the path of copied files since that is the current directory displayed on the right side.
- The accountName root is automatically included. Project ID directories should be copied to this root directory.
On the left side of the screen, you can browse folders on your computer. To ingest, navigate to the appropriate folder location on both screens and copy the files and/or directories to be ingested into the destination folder by selecting, dragging, and dropping them.
- If you have multiple groups under a Project Name, you can copy at the Project Name level by dragging the project folder from your computer to the root directory in the S3 view.
- If you've already set up the project directory on S3, you can copy the group-level (Capture Group ID) directories into the project directory.
AWS API's for programmatic uploading to the S3 bucket
Instructions for using the AWS SDK to access S3 can be found here.
Viewing Ingest Errors and Status
Overview
The QC site is a status management tool that allows you to review the statuses of multiple batches on the same screen. You can view the status of groups submitted for ingesting, whether they are "completed" or "failed."
Access
FamilySearch should have provided you with a username and password for QC site access.
Using the QC site
-
Log in to the QC website (https://fsmsv.com/), using your provided credentials. The login text fields are located on the upper left side of the screen.
-
Once you log in, you'll see your batches if you have any.
-
Add batches through the QC site.
-
Review batch status to see if they have passed the image and metadata checks.
-
Approve and push selected batches to be moved to production. Or delete the selected batches.
Uploading Batches
You have the option to upload batches through Cloudberry, which is faster, especially for multiple large batches. Note that batches uploaded through Cloudberry will not be pushed to production until they have cleared all QC checks, and approved by project managers.
Monitoring Ingest Status
Use one of the FamilySearch status dashboards or the Status Service API to monitor ingest progress and identify errors. Contact FamilySearch for dashboard access.
Status Service API: PUT /status/groupStatus/{projectId}
Documentation: pipe-dpc-ingest-status: StatusController
Updated 9 days ago