
Authorization Code Flow
In order to obtain an access token for integrating a web, desktop, or mobile app with the FamilySearch API, a user will need to complete an authentication and authorization process using OAuth 2.0 Authorization Code Flow. This guide will help you to learn how this works, what is required, and provide some ideas on how you might approach this integration. The following specifications can be referenced to obtain further understanding and implementation details.
Auth Process Overview
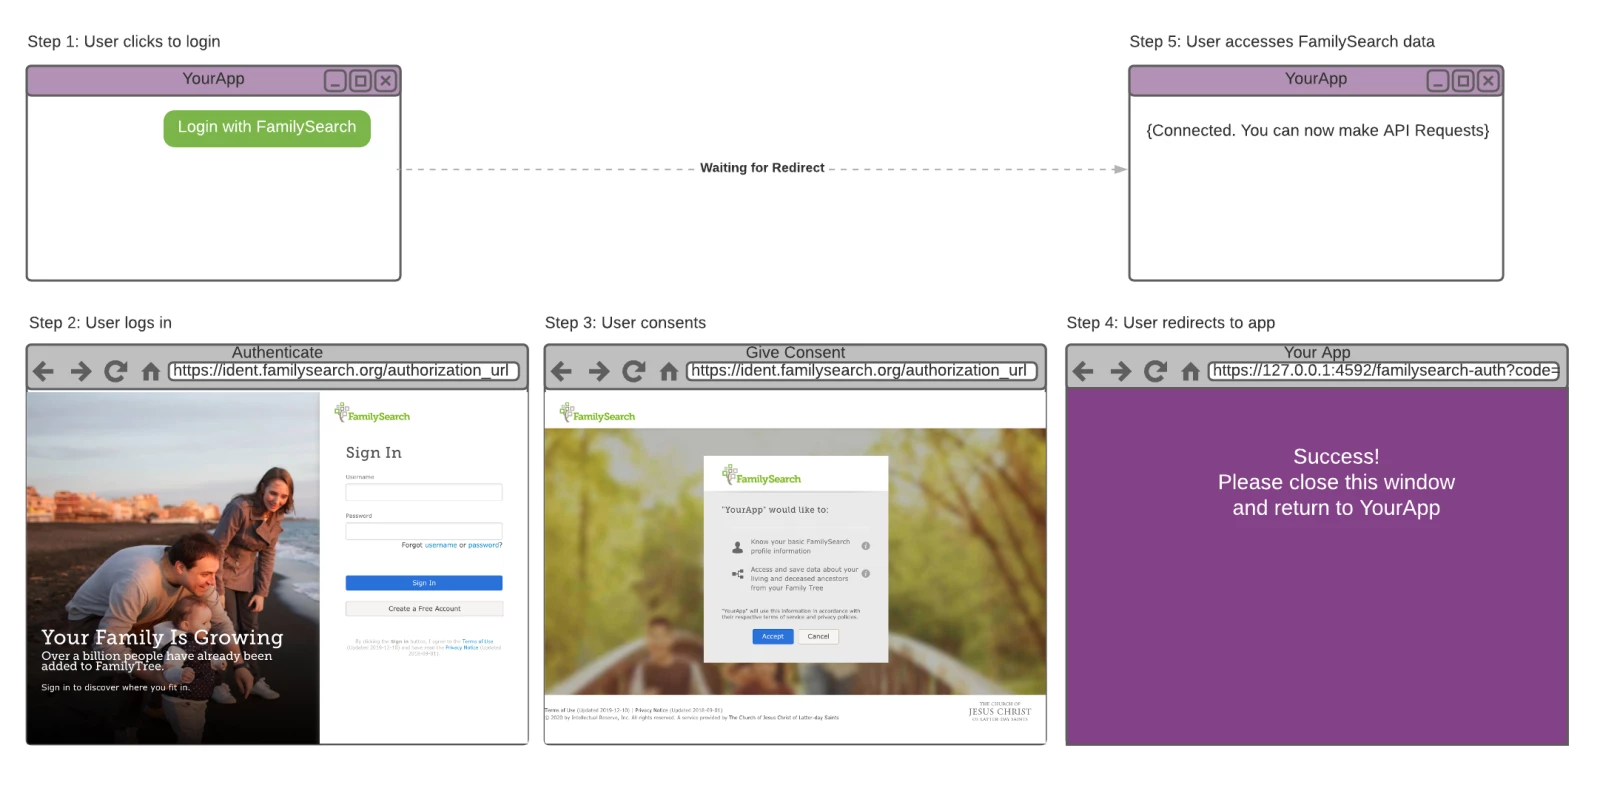
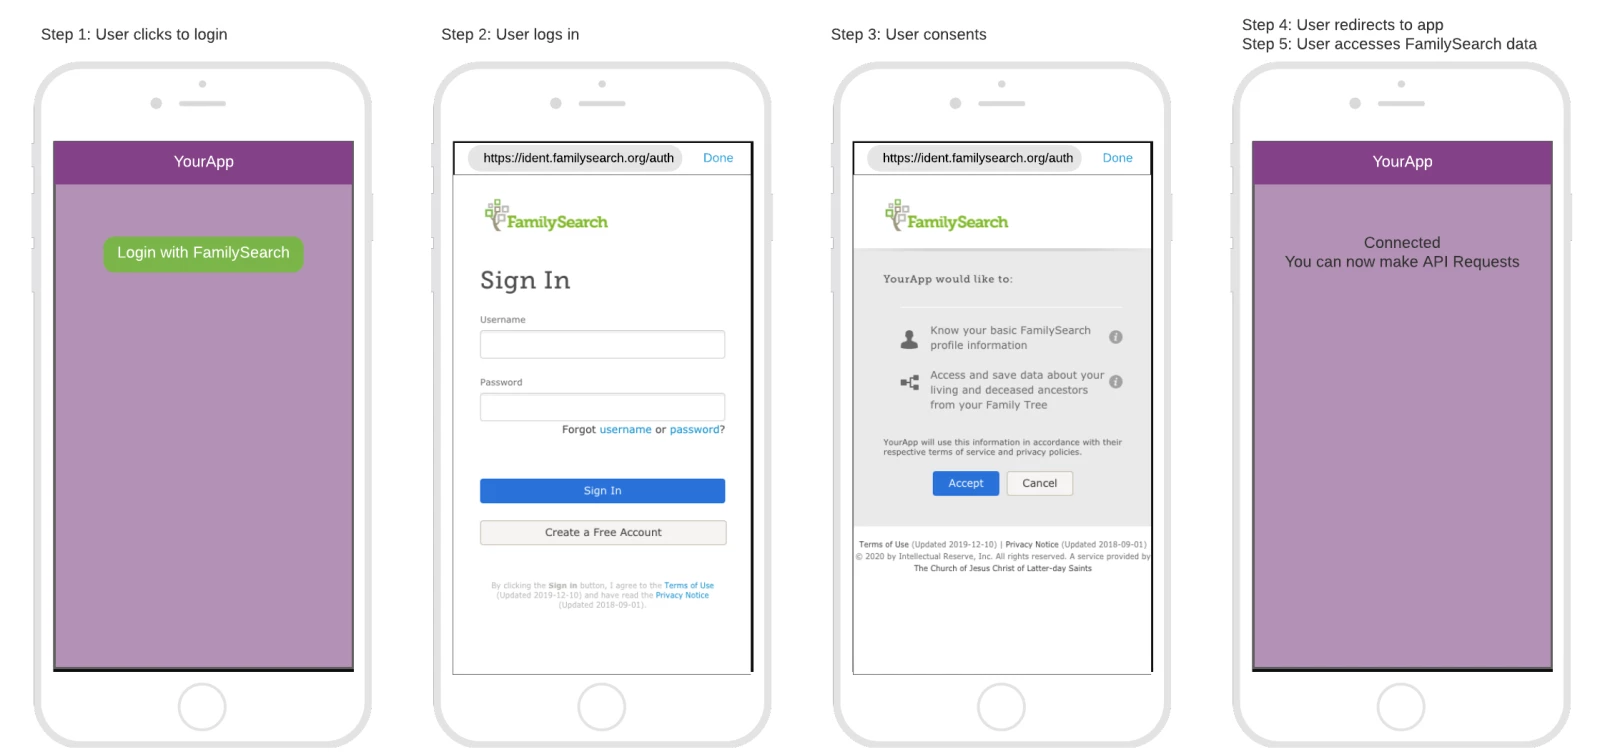
This section describes the experience your users will complete in order to complete the authorization flow. You have likely experienced this flow when authenticating an app with a service like Google or Facebook. Here are the basic steps the user will experience.
Step 1: User clicks to login
The app will prompt the user to login with FamilySearch. The user will click on a button or link that says something like "Login with FamilySearch". This action will take the user to the FamilySearch login page — in a web browser for native and mobile apps, or in the same browser tab for web apps.
Step 2: User logs in
The user will view the FamilySearch authentication page and use their FamilySearch credentials to login.
If the authorization request is configured to use OpenID Connect, it is possible that the user could already be logged in on FamilySearch and the user will automatically advance to the next step.
Step 3: User consents
The user will be prompted with a request to grant permission for the app to access FamilySearch data on behalf of the user. The user will click "Accept" or "Cancel" and will be taken back to the app's redirect URI.
Step 4: User redirects to app
If the user accepted the permission, the app should receive a code to be exchanged for tokens. If the user canceled, the app should receive an error code and message indicating that the user declined consent.
Step 5: User accesses FamilySearch data
The application will exchange the authorization code for tokens. Upon successful exchange, the app will receive an access token. The access token will be used with requests to the FamilySearch API.
Desktop User Experience
Mobile User Experience
Authorization Request
The Authorization Request is the request made by the user's browser to the location which will prompt user authentication and consent. To implement, your app will construct the Authorization Request URL with the appropriate query string parameters. The following is information to help you construct the request.
FamilySearch Authorization Resource Documentation
The following are the query string parameters to be used.
| Parameter | Value |
|---|---|
client_id | This is the app key assigned to your application. |
redirect_uri | This is the URI used to complete the flow. If the URI hasn't been registered with FamilySearch, you will receive an error. |
response_type | This must be set to code. |
state | (recommended) This parameter will be returned to your redirect URI. For more information, see the section "Redirect URLs and State" in the OAuth 2.0 Simplified book. |
scope | This can be set to openid if your app desires to use OpenID Connect. See the OpenID Connect section for more details. |
prompt | (optional) Set to login to force re-authentication even if the user already has an active FamilySearch session. |
code_challenge | Native and mobile apps only. This is the hashed and encoded random string described in the PKCE section. |
code_challenge_method | Native and mobile apps only. This should be set to S256 if using a SHA 256 hash method. Set to plain if your application is unable to hash the code verifier. |
Note that all values of the query string parameters should be percent encoded.
Authorization Endpoints:
- Beta:
https://identbeta.familysearch.org/cis-web/oauth2/v3/authorization - Production:
https://ident.familysearch.org/cis-web/oauth2/v3/authorization
Example Authorization Request URL (Web App):
https://identbeta.familysearch.org/cis-web/oauth2/v3/authorization?client_id=a02f100000SSxKMAA1&redirect_uri=https%3A%2F%2Fexample.com%2Fauth%2Fredirect&response_type=code&state=237589753&scope=openidExample Authorization Request URL (Native/Mobile App with PKCE):
https://identbeta.familysearch.org/cis-web/oauth2/v3/authorization?client_id=a02f100000SSxKMAA1&redirect_uri=http%3A%2F%2F127.0.0.1%3A57938%2Ffamilysearch-auth&response_type=code&state=237589753&code_challenge=1j_SZ7VLys6EddDGmv6K69OMNgV2KfGG5T4Oaz1cDIE&code_challenge_method=S256&scope=openidHandling the Redirect
After the user completes the authentication and grants permission, the browser will redirect back to the redirect_uri, appending the following query string parameters.
| Parameter | Value |
|---|---|
code | If successful, this parameter will contain the authorization code that will be used to exchange for tokens, which will be discussed in the next section. |
state | If provided on the authorization request, this parameter will contain the same value. |
error | If unsuccessful, this will contain an error code. For information on possible error codes, see Section 4.1.2.1 of the OAuth 2.0 Specification. |
error_description | If unsuccessful, this will contain a human readable (English) description of the problem. |
Success Example:
https://example.com/auth/redirect?code=2952-60121-6-53-114117-3157-8667122-10822&state=237589753Error Example:
https://example.com/auth/redirect?error=access_denied&error_description=User+declined+consent.Token Request
The Token Request is used to exchange the authorization code for tokens. This is done by performing an HTTP POST to the Token Resource. The following is information to help you construct the request.
The body of the POST should contain the following parameters, encoded as application/x-www-form-urlencoded. Please refer to the resource documentation for setting appropriate headers.
| Parameter | Value |
|---|---|
client_id | This is the app key assigned to your application. |
code | This is the authorization code received from the redirect. |
grant_type | This must be set to authorization_code. |
redirect_uri | This should be the redirect URI used when initiating the flow. |
code_verifier | Native and mobile apps only. This is the original random string used to generate your code challenge. |
The response will contain a JSON document containing the access_token, and if configured for OpenID Connect, an id_token.
Token Endpoint (all environments): https://identbeta.familysearch.org/cis-web/oauth2/v3/token
Example Request:
POST /cis-web/oauth2/v3/token HTTP/1.1
Host: identbeta.familysearch.org
Content-Type: application/x-www-form-urlencoded

client_id=a02f100000SSxKMAA1&grant_type=authorization_code&redirect_uri=https://example.com/auth/redirect&code=tGzv3JOkF0XG5Qx2TlKWIA
Example Response:
{
  "access_token": "your-access-token-here",
  "id_token": "your-id-token-here",
  "refresh_token": "your-refresh-token-here",
  "token_type": "Bearer"
}
An access token expires after a period of inactivity with a max life of 24 hours.
Open ID Connect
OpenID Connect is a simple identity layer on top of the OAuth 2.0 protocol that brings the following benefits to your user experience.
OpenID Connect enables your users to take advantage of their existing FamilySearch.org authenticated session. If the user is logged in on FamilySearch.org, it will not require the user to log in again. If the user was not previously logged in on FamilySearch, the process of logging in to obtain an access token will also initiate a FamilySearch.org session. This enables the user to follow links to the website without needing to re-authenticate for as long as the website session remains active.
Another benefit is that the POST to the Access Token Resource will return an Access Token and an Identity Token. The Identity Token contains profile information for the user. This can simplify your integration by eliminating the need for a subsequent call to the Current User Resource.
To use OpenID Connect with your integration, add scope=openid to your Authorization request.
Identity scopes can be used to request claims for the identity token. You can request the following scopes: givenName, family_name, locale, gender, email, qualifies_for_affiliate_account, user_id, and country.
The profile scope returns givenName, family_name, gender, language, and locale.
Example Redirect URL using an Identity Scope:
https://ident.familysearch.org/cis-web/oauth2/v3/authorization?response_type=code&scope=openid%20profile%20email%20country&client_id=a02j000000KTRjpAAH&redirect_uri=https://example.com/auth/redirectExample JWT Returned — When using an identity scope, you'll receive a JSON Web Token (JWT) in the response:
{
  "access_token": "your-access-token-here",
  "id_token": "eyJhbGciOiJIUzI1NiIsInR5cCI6IkpXVCJ9.eyJzdWIiOiIxMjM0NTY3ODkwIiwibmFtZSI6IkpvaG4gRG9lIiwiaWF0IjoxNTE2MjM5MDIyfQ.SflKxwRJSMeKKF2QT4fwpMeJf36POk6yJV_adQssw5c",
  "token_type": "Bearer"
}
To decode a JWT, see jwt.io. To see sample code and a working prototype, see fs-auth on GitHub.
Note: When implementing OpenID Connect with the scope parameter, if you see a realm-related error after redirecting to the FamilySearch authentication URL, see Developer Support for instructions on how to have a realm added to your app key.
Requesting Additional Access and ID Tokens
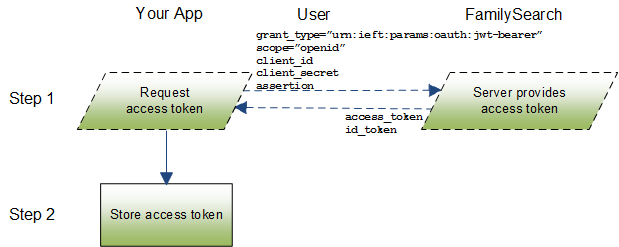
After successful authentication, you can use your valid ID token to request additional permissions or identity claims. This is done by POSTing a request to the token endpoint with the following parameters, as defined by the JWT Profile for OAuth 2.0 Client Authentication and Authorization Grants spec:
| Parameter | Required | Value |
|---|---|---|
grant_type | Yes | The type of authorization grant requested. The value is "urn:ietf:params:oauth:grant-type:jwt-bearer" for the JWT bearer flow. |
client_id | Yes | The client identifier for your application is your app key. |
client_secret | Yes | Required for confidential clients but not for public clients. It must NOT be set for public clients. |
assertion | Yes | The ID token returned from the original login flow. It's the ID token from FamilySearch. |
scope | Yes | Used to specify what access privileges are being requested for access tokens. Set to openid and any other number of valid scope requests. For more information, see Authorization Scopes. |
Refresh Tokens
This is not available for general use.
Updated about 1 month ago